|
The following step-by-step instructions will guide you through the process
of downloading certain customer account information from the Web site
to a file that is saved onto your desktop. This file will be saved in
a format commonly known as Comma-Delimited or Comma-Separated Value (.CSV).
You may then import this file into Microsoft Excel® or any other spreadsheet
program on Windows® or Macintosh® systems that understands this
file type.
The download feature, available on various pages throughout the Web site,
is intended to provide access to information about a particular clients’
accounts or transactions. The feature does not support downloading information
at a book-of-business level.
 TIP:
Be sure to use the sort and filter options on the page from which
you are downloading to customize the data that is included in the download.
For example, on the Transaction History page, you may view transactions
for a specific date range and only those transactions within the date
range will be included in the download. TIP:
Be sure to use the sort and filter options on the page from which
you are downloading to customize the data that is included in the download.
For example, on the Transaction History page, you may view transactions
for a specific date range and only those transactions within the date
range will be included in the download.
| NOTE: |
The following instructions were prepared using
Internet Explorer® and a Windows-based operating system. Different
steps may apply if you are using a Netscape® browser or a Macintosh
system. |
Step 1
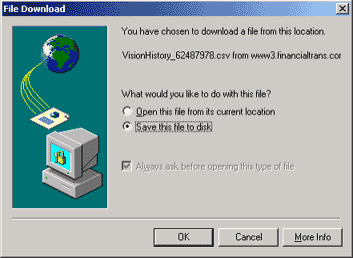
After selecting the Download option and clicking "Go", you
will see the File Download window. The default selection will be "Save
this file to disk." Click "OK" to proceed to Step 2.
Alternatively, if you wish to view the information without first saving
a file to your desktop, then change the selection to "Open this
file from its current location." Click "OK" and Excel
will automatically launch and display the information from the Web page.
In order to avoid losing this information, you will have to save this
file before closing Excel.

Step 2
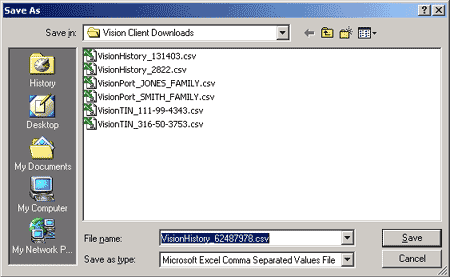
Once that you have chosen to save the file to your desktop, you are
prompted to select a location and file name. Your operating system will
provide a default folder location, but you may change this by using
the drop down box at the top of the window next to "Save in."
The default file name starts with Vision followed by the page name
and an identifier such as the portfolio name or account number. You
may change the default by typing a new name in the field next to "File
name." Click "Save" to continue.
 TIP:
Be sure to take note of the folder and file name in case you
need to find the file on your desktop at a future time. In this example,
we have established a special folder on our desktop called "Vision
Client Downloads" to conveniently hold all downloaded files. TIP:
Be sure to take note of the folder and file name in case you
need to find the file on your desktop at a future time. In this example,
we have established a special folder on our desktop called "Vision
Client Downloads" to conveniently hold all downloaded files.

Step 3
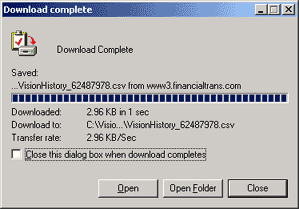
Once the download is complete, click "Open" to automatically
launch Excel and review the contents of the file.

If you have any problems with the Download function, please call a Vision
Product Specialist at 1-800-435-4112.
|


